
August 24, 2017
If you upload images from your camera directly to your website, you’ll probably end up with one or both of the following two problems:
(i) the images will be extremely large in terms of file-size and make your page load slowly (this is annoying to your visitors and will cause people to abandon your site before they’ve seen much, if anything; it also causes Google to down-rank your site, losing you potential traffic from people using Google search)
(ii) the images will be displayed as resized or re-dimensioned images with a loss of detail
Resizing your images before you upload them can solve both these problems and if you take the time to use Photoshop’s tools for best results, you can get both very small file-size images with really good detail.
USING PHOTOSHOP’S “SAVE FOR WEB AND DEVICES” OPTION
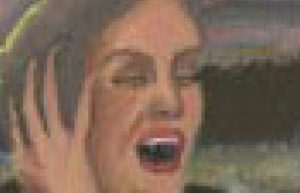
Below are a couple of cropped images taken from an image a client sent me which was a very high-resolution image of a painting, clearly showing the canvas texture). The first image was saved as a jpeg the regular way—resulting in a 153kb image. The second one was saved using Photoshop’s “save for web and devices” option—resulting in a much smaller 27kb image. This is a significant improvement, especially when you are displaying multiple images on one page.

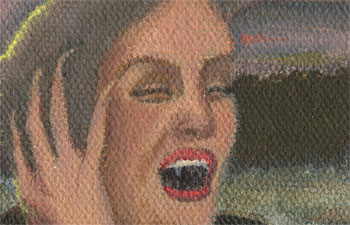
You’ll find Photoshop’s “Save for web and devices” option beneath the regular “Save As” option when you open Photoshop’s “File” menu. You can produce an image that’s almost exactly the same as the jpeg you get from “Save as” but it will be a significantly smaller file size. The reason for this is that the file will be saved without an accompanying preview thumbnail and without all the metadata.
The one thing that is just a little bit different is the rendering of reds in a saved-for-web image. For some reason, reds don’t save quite as well as the other colors (you can see the color difference in the images above), so if you have images that have a lot of red in them, you may prefer to use the regular “Save as” [jpeg] option.
The default quality setting is 60 and you can sometimes go lower than this to get even smaller file-sizes for images that are still acceptable quality for your web pages. But even if you use 80 or 100 quality (for really sharp images), “Save for web and devices” will get you small file-size images.
FIND OUT WHAT IMAGE SIZES ARE USED IN YOUR WEBSITE
While using “Save for web and devices” will get you a smaller file size from whatever image-size you save, actually reducing the dimensions of your images before you upload them will also significantly reduce the file size.
Before you get started you need, therefore, to know what the maximum display-size is for the images on your website.
If you don’t know, you are probably safe to assume it won’t be more than 1024 px wide or 600px high. Too many commonly-used computer screens can’t display an image (in full) at larger sizes than this, so there are only a few websites that need larger images.
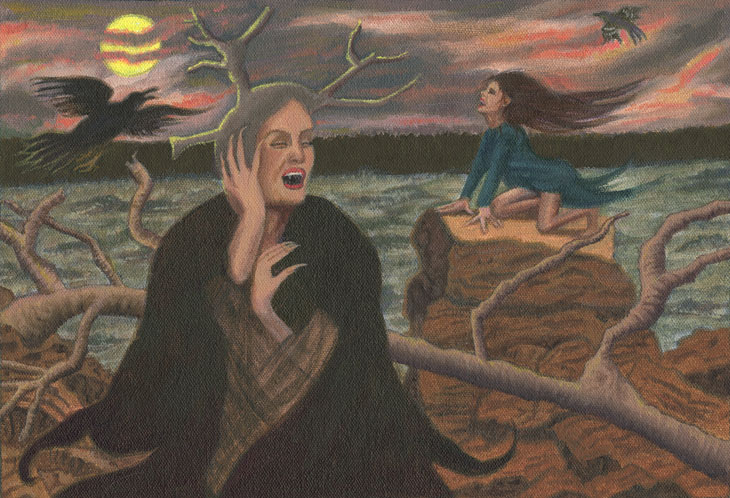
To give you some idea how to gauge the dimensions of an image, here is the full image used for the above details, resized to 730px wide by 498px high (730px is the max-width for the blog content). If you’re reading this post on a computer, it will be displaying at those dimensions (mobile devices will be displaying it at smaller sizes).
If you don’t know what size the images are displaying at on your website or if you haven’t decided yet, please read Best image sizes for your website or blog
RESIZING IN STEPS
Once you have decided what size you can safely reduce your images to, you may want to use Photoshop’s advanced tools for resizing in steps to maintain the best image quality.
The reason for this is that every time you reduce the size of an image, the color of each pixel in the new image is an averaged blend of several pixels in the original.
Take a look at the following four images:


The first image is a 4×4 pixel crop from a 16×16 pixel image.
The second image is the image that results from reducing the 4×4 image to 2×2 pixels.
The third image is the 16×16 pixel image (with the red pixels top right)
The fourth image is what happens when you reduce the 16×16 image in one step to a 2×2 pixel image. The red color gets lost completely.
It is inevitable that some of the minute detail like this gets lost in the reduction process but the fallout can be managed by resizing in 50% steps. This process keeps the colors from getting too mushed-together. If you are going to reduce your image to one that is 550px high and your original is 6000 pixels high, you would first reduce to 4400 then to 2200 then to 1100 then to 550 (or you could reduce to 3000 then to 1500 then to 750 then to 550—as long as you never reduce more than 50% at a time).
Further, sharpening the image using the oddly-named “Unsharp Mask” (found under “Filters > Sharpen”) can keep details like lines and borders crisp, as this tool increases contrast wherever significant differences are detected. You can adjust the degree of sharpening: about 0.3 degrees radius at 100% works well for reducing images when they are large. Once an image gets down to a dimension below 1000px (width or height) you should reduce the radius and/or the percentage or abandon the unsharp mask altogether (or you can end up with an over-sharpened image, which looks worse than a blurry image). The threshold is a fine-tuning tool that you can experiment with but you can usually dispense with it and still get a good result. Toggling preview will allow you to see the effect of the sharpening process. Once you’re happy (don’t over-do it), click OK.
You’ll want to play around with this tool to see what works for your images, as some images need sharpening more than others. Images that have no crisp lines in them do not benefit from sharpening. If your images do have crisp lines but you don’t have the time or confidence to make the adjustments manually, you can get decent results by choosing the “Bicubic Sharper (best for reduction)” selection available at the bottom of the image size window (where you set the new dimensions).
Consider the following two details (enlarged to reveal the pixellation):
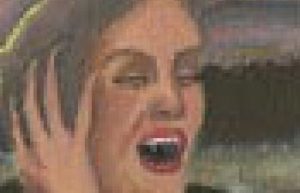
The first image was reduced to its final size in one step and shows considerable pixellation (a blocky look). The second image was resized down in five 50% steps and the colors have merged better. These images have been enlarged and the pixellation is therefore accentuated, but even with non-enlarged display, deterioration in image quality is apparent.
If you have a group of images that all need to be resized to the same smaller size and you are choosing to use the “Bicubic Sharper” image resizing option rather than manually adjusting each image to optimum sharpness at each reduction, you can easily automate this process by recording an “action” to iterate through the same resizing steps for each image.
To do this:
- create a folder for the resized images
- open the first image to be resized
- open the actions window
- click the page icon to “create a new action”, give it a name and click “Record”
- go through the 50% size reductions you need until you reach the final size
- save the image to the folder you created (preferably via :”Save for web and devices”) without giving it a new name
- close the original image without saving changes
- click the red square “stop recording button
- open all the other images to be resized and with each one, choose the action you just created and click the “play” button (using the Automate > Batch option is sometimes a more efficient way to iterate through a batch of images, but not always)
All this may sound like a lot of work, but once it’s done, it’s worth it.
Remember to read Best image sizes for your website or blog if you’re not sure what size you want to make your images for your website.
The images used in this article are from Susanna Plotnick’s trilogy of graphic novels, The Exile Trilogy.


